you can cook
  • You Can Cook!
  • About Me
  • Recipe Box
    • Appetizers >
      • Buffalo Chicken Dip
      • Cream Cheese Appetizer
      • Sweet and Salty Nuts
      • Thai Peanut Sauce
    • Beverages >
      • Blueberry Lemonade
      • Cosmopolitan
    • Breakfast >
      • Apple Pancake
      • Homemade Granola
      • Peanut Butter Cup Smoothie
      • Stick-to-your-ribs smoothie
      • Veggie Omelet
      • Yeasted Waffles
    • Main Dishes >
      • Beef Stew
      • Chicken Fajitas
      • Choley
      • Grilled Chicken
      • Low and Slow Chicken Breasts
      • Roast Turkey
      • Rub for Pulled Pork (and other meats too!)
      • Salmon Burgers
      • Simple Homemade Mac & Cheese
      • Simple Red Sauce
      • Steak and Potato Salad
    • Sides >
      • Bacon-Roasted Brussel Sprouts
      • Creamy Polenta
      • Homemade Potato Chips
      • "Magic" Salad Recipe
    • Soup >
      • Apple Cheddar Soup
      • Butternut Squash Soup
      • Chicken Noodle Soup
      • Creamy Tomato Basil Soup
      • Smokey Beef Chili
    • Sweets and Treats >
      • Almond Cake
      • Apple Crisp
      • Bruna Kakor
      • Butterscotch Pecan Sandies
      • Chocolate Fudge Brownies
      • Chocolate Mousse
      • Compost Cookies
      • New York Times Chocolate Chip Cookies
      • Pumpkin Pie
      • Salted Caramel Sauce
  • Classes
  • Contact Me
you can cook

Scrumptious Salmon Burgers

5/28/2016

Comments

 
Picture
In our culture, we describe a meal based on the type of meat, and so I might say, "I had chicken for dinner" or "I had pork for dinner" or "I had fish for dinner". But in Seattle, there is an entire category of meat that most of the country doesn't separately recognize: the category of salmon.

There's a good reason for this - huge amounts of salmon are caught in the Pacific Northwest and Alaska. Visit the fish ladders at the Chittendon Locks in Ballard between July and September, and you can see entire schools of 2'+ salmon making their way upstream. One summer, the salmon harvest was so large the grocery stores were giving them away for free (limit 2, please).

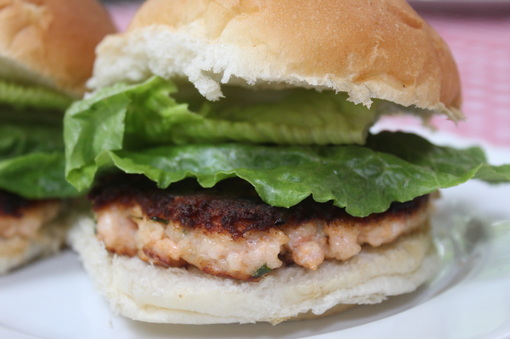
Nearly all of my family now live in the Pacific Northwest, and I have had salmon many, many ways: poached with dill sauce, baked on a cedar plank, stuffed in puff pasty, made into sushi, or grilled and Rubbed with Love. But my favorite is the humble salmon burger.

I have frequently purchased salmon burgers from my local fishmonger. The problem with those burgers however is that they have so much fat that I find myself popping Tums within a few minutes of the completion of my meal...and personally, as a dessert, Tums leave much to be desired. Plus it seems somewhat ironic to consume my entire day's limit of grease eating an allegedly healthy food like fish.

So while my search for the perfect salmon burger doesn't quite rise to the level of a quest (for example my caramel sauce adventure), it has been an interest for quite a while. And I'm proud to say, I think I've found a winner.

This simple and flexible recipe for salmon burgers can be prepared at least two ways: as full-sized burgers, or as mini-burgers for an unusual but memorable appetizer. For a full sized burger, you can use your hands to shape the mixture, or get an inexpensive single-use kitchen tool: a burger press. For the uninitiated, you fill the press with ground meat and then rotate the handle to release a perfectly-shaped burger into your hand. Although this may seem a bit fancy for some (and anathema to people like me who decry single-use kitchen tools) it actually makes some sense: burgers - whether salmon or any other meat - are prepared quickly and without having to pack down the meat, and it's a lot easier to make them all the same size, ensuring even cooking.

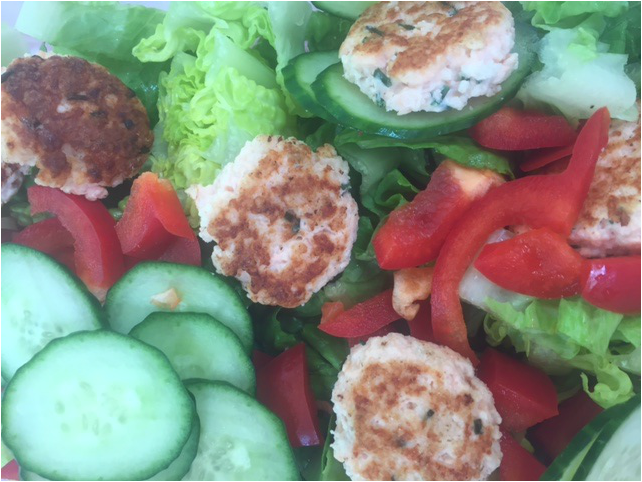
To make mini-burgers, use the smallest cookie scoop (about 2 Tbs), and release a flat-sided scoop directly into a non-stick skillet. Saute on both sides, flattening with your spatula to form a mini-burger. By the time it's browned on one side, the fish will be perfectly cooked. I served mine on Triscuits with a bit of chive on each one for color. In the photo below, I used them to make a salmon salad.
Picture
As to the type of salmon, the recipe was developed with farmed salmon, which is more oily than wild. If you can get wild, it's delicious - just be sure to remove all the small bones before chopping (or enjoy your extra calcium). Although farmed salmon is not as healthy as wild, it's much less expensive and quite tasty. A good taste and health compromise in New England is farmed salmon from Norway, which does not allow antibiotics to be used in fish farming, among other beneficial practices.

So this summer, even if you can't get to the Pacific Northwest - which is beautiful and actually far less rainy in the summer than New England - bring a little bit of Seattle to your grill by making salmon burgers...you're going to LOVE it!

On a weekend that can be focused on grilling, friends and fun, I would like to offer my heartfelt thanks to all of the veterans who have sacrificed in ways large and small for our shared country. God bless you on Memorial Day and throughout the year.

Chris

​​If you would like to see my recipes, tips and adventures in cooking every week go to www.ucancook.net and enter your email on the right side. Alternatively, email me at [email protected] and I will set you up! For even more tips and techniques, follow You Can Cook on Facebook.
Comments

Happy Mother's Day to me

5/23/2016

Comments

 
Picture
Many people have asked me about my Mother's Day. In truth, I was brutally attacked...by a wrap.

My daughter and I were enjoying a lovely lunch in Newburyport. The sun was shining and we were investigating all the cute little stores. We stopped for lunch and I ordered a gyros wrap with onion rings (oh, how I love onion rings!).

Both were fabulously delicious, when suddenly the attack began. After taking a bite, I realized that my onion rings were sitting in a pool of wrap-dressing. I quickly moved them to higher ground, and then without warning, the flood ensued. A gap in the foil wrapper caused the dressing to go everywhere. My plate, the table, the chair, the floor, even the window next to our table...covered in oily dressing.

Then I looked down and saw that I was sitting in a puddle of it. It was also dripping down the front of my coat, shirt and hair. If I had to guess, I'd say more than one CUP of dressing had attached itself to my person and immediate surroundings.

My onion rings forgotten, I quickly sprang from my chair, trying to remove the offending grease from my shirt and jeans, but it was useless. I then took an entire roll of paper towels to the restroom, and proceeded to remove dressing from myself and my clothing, right down to the socks and underwear. This required a good deal of water, and I was fortunate that there was one of those extremely powerful hand dryers...and that it was a single-stall restroom. Because although I don't often feel embarrassed, I'm not sure I could have dried everything required under a hand dryer in a multi-stall facility.

The story has a happy ending. Thanks for the brilliant engineers at Excel (the hand dryer people) and an entire trash basket of paper towels, I emerged mostly clean and mostly dry, ready to finish my day with an extremely embarrassed teenage daughter.

But there are lessons to be learned from my nasty experience.

First, gyros (like Cheetos and baby back ribs) are a food best eaten in private. I'm normally pretty good about this, but it was Mother's Day so I guess that I thought the normal rules did not apply.

Second, when you are a host planning food, think not just about what your guests might like (pigs in a blanket = joy for anyone under 16), but how they will eat it. Small finger foods are the best at gatherings of more than 8 people; guests can grab a piece (and maybe a napkin on the side) and go. Save things eaten with a knife & fork for other occasions.

Years ago, I attended a benefit with drinks & appetizers. Due to poor planning on my part, I arrived quite hungry and deicded I would grab an appetizer or two. I knew they were there...I could SMELL them...but somehow never found one until I was offered a piece of beef wellington. While talking to a very elegant woman I accepted a piece of beef, however once I bit into it, realized my error: my lipstick was immediately and completely covered in flakes of puff pastry. I spent the entire conversation basically trying to chew the stuff off my own lips...as discretely as possible. I don't think I ever saw that woman again, but that may have been because she's been crossing the street to avoid me ever since.

Here are some tasty - and easy to eat - suggestions for your next gathering:
Sweet & Salty Nuts
Ham-wrapped asparagus spears (bonus - a no-carb recipe!)
Thin Italian breadsticks, such as Alessi
A couple of cheeses on a board or plate (one soft cheese and one hard) with a bowl of grapes on the side
Bacon cream cheese roll ups (extremely unhealthy, but simple to make and very, very good; picture at left)
Chocolate fondue with mini-marshmallows speared with tiny pretzels for dipping
Buffalo Chicken Dip​

​Any of these would leave your guests happy...and not wearing the food you are trying to serve them.

​If you would like to see my recipes, tips and adventures in cooking every week go to www.ucancook.net and enter your email on the right side. Alternatively, email me at [email protected] and I will set you up! For even more tips and techniques, follow You Can Cook on Facebook as well.


Comments

Impossibly delicious - and simple - vegetables

5/16/2016

Comments

 
Picture
Picture
I've often started my posts with stories of cooking disaster; an overcooked turkey, a failed salad made of shredded brussels sprouts, and the time I stuffed a roast chicken with a weed I believed to be sage. But with roast vegetables, I have no failures to share because it is almost impossible to do it incorrectly.

The basic recipe is simple: line a cookie sheet with foil, place evenly cut, clean dry fresh vegetables on the sheet and toss lightly with olive oil and salt. Making sure they are no more than one layer deep, bake at 450 degrees for 12 - 20 minutes, until the vegetables are crisp-tender (i.e. you can pierce them with a fork).

My son (21) attends the Riverview School in Sandwich, MA and in his dorm, they cook dinner together most nights. He recently send me a picture of the roast vegetables he prepared for his dorm. If a bunch of young 20-something men can cook roast vegetables - and enjoy eating them - you can be pretty sure you can cook and enjoy them too.

A word about salt. Salt has a bad name, and part of that is well-deserved. If you look at the back of a can of soup, frozen dinner or many other prepared foods, the amount of salt per serving is shocking; sometimes as much as your entire recommended daily intake. However, when you cook food that is REAL (i.e. not manufactured), adding a bit of salt is often a crucial step for great flavor. So when you make this recipe, add more than a pinch; unless you're on a salt-restricted diet, it's not going to hurt you.

Here is a partial list of vegetables that taste great roasted:
  • Asparagus (snap off woody base of stem, usually about 1", and roast whole)
  • Beets (boil until the peel slips off and cut to 3/4" cubes)
  • Broccoli (break into equal sized florets, about 1")
  • Brussels sprouts (trim and halve, also see my recipe for brussels sprouts roasted with bacon)
  • Butternut squash (peel and cut into 3/4" cubes)
  • Carrots (cut into 1" pieces, peel if desired) 
  • Cauliflower (break into equal sized florets, about 1")
  • Garlic (peel and trim end but leave bulbs whole)
  • Onion (peel and cut into 3/4" pieces)
  • Parsnip (peel and cut into 3/4" pieces)
  • Potatoes (especially the waxier types such as red, blue or yukon gold; cut into 3/4" cubes)
  • Sweet Potatoes (peel and cut into 3/4" - 1" cubes; they cook more quickly than regular potatoes, so cut the sweet potatoes larger if roasting together)

Picture
This technique is great for when you have guests; it looks elegant but is very simple (and if you are spending time on the main course, the veggies need to be quick and easy). Buy a few of the vegetables above, and wash, dry and cut them up. Put in a ziploc bag and toss with oil and salt up to 1 day in advance. Preheat your oven to 450 degrees, and 20 - 30 minutes before you plan to serve dinner, pour the vegetables from the bag onto a lined jellyroll pan in a single layer and slide them in. Remove when done, and pour into serving dish. The only caveat with this is that if you are using vegetables whose color might bleed (beets, red onions, multi-colored carrots), bag those separately. A beautiful array of roast vegetables is a dramatic and delicious add to any meal.

Another way to do this is on the grill. If you have a grill basket, you can use that, but if not, do what countless generations of scouts have done: roast them in a foil packet with a couple of holes punched on each side.

Here are some great combinations:
Asparagus, multicolored peppers and shallots (pictured before roasting below)
Potato, carrot and onion

Beets, white onion, butternut squash 
Butternut, carrot, parsnip and red onion
Sweet potato and white potato ("crazy taters")
Red, white and blue miniature potatoes (you can buy this mixture)

My personal favorites are asparagus, multi-colored carrots (just trim off the top) and broccoli. I have eaten an entire pound of asparagus prepared this way; ditto for farmstand carrots.
Picture
If you've read this far, you've probably just spent more time reading than it would take you to prepare a pound of roast vegetables. With farmer's markets starting up (or having started if you live in a lovely warm place), there is no better way to celebrate each delicious bite. Buy a couple of interesting new vegetables - or even some reliable old ones - and give it a try. You won't be disappointed!

​​If you would like to see my recipes, tips and adventures in cooking every week go to www.ucancook.net and enter your email on the right side. Alternatively, email me at [email protected] and I will set you up! For even more tips and techniques, follow You Can Cook on Facebook.
Comments

Feeding a Crowd

5/4/2016

Comments

 
Picture
There are times when you need to feed a group...a BIG group. This is actually a little more complex than it sounds because unless you have access to a commercial kitchen, your oven, stove and especially your pots and pans are too small to prepare more than about 12 servings of most foods. Plus, if you are hosting the crowd, you probably have more to do than just cook.

But there are many simple ways to feed 30, 40 or even 50+ people, and one of them is to serve pulled pork. Don't let the fact that you are not a barbecue pit master stop you from attempting this dish; although it takes a long time to cook, the preparation is very simple and you just need a few tips to achieve pit master-level results.

The first and most critical step is selecting the meat. Costco sells a pork shoulder (photo below) that works really well. Another good cut is often called a "Boston butt" or "pork butt" (names vary regionally). Ask your butcher which cut you should use - butchers are a great resource for this type of question. You should plan about 3/4# per person for sandwiches and as much as one pound per person if you are serving the pork on it's own. This sounds like a lot, but it loses up to 25% of its weight as it cooks. Of course, you can reduce these amounts if there are many other dishes being served.

Picture
The next step is the rub, a combinations of sugar, salt and spice. You can buy it or make your own. For purchased rub, I like the salmon version of "Rub With Love" for both salmon and pork. Making your own rub is simple and inexpensive, and it keeps for up to a year. The evening before you are going to cook your pork, generously coat the pork on all sides with the rub and refrigerate the pork (uncovered if possible) overnight. 

First thing in the morning, get the pork out of the refrigerator and bring it to room temperature on your counter (this is perfectly safe unless you have a counter-surfing dog in your home). After an hour, preheat your oven to 275 degrees and put the pork in, fattier side up. Depending on the size, it will take several hours to cook - allow a solid 6 hours. This is a very forgiving meat; it needs to reach 200 degrees but if you cook it a bit longer, it will still taste great. Use a meat thermometer to confirm that the meat has reached 200 degrees.

A note about slow cookers (crockpots). There are many good crockpot recipes for pulled pork, and if your oven is otherwise occupied, a crockpot will do the job. The problem with a crockpot is that it's a moist cooking method, and your pork won't develop a crispy exterior if prepared this way. So crockpots are a good backup plan, but an oven is the preferred choice. A grill is a great choice (bonus - it frees up your oven and doesn't heat up the house), but only if you can truly control the heat.

Once the pork reaches 200 degrees, take it out of the oven and let it cool for 30 minutes or so. This is not necessary for the recipe, but will make it much less likely that you will burn yourself when you pull it. When the pork is done, it should smell fabulous and be crispy on the outside; the outside pieces are called the "bark".

Picture
Picture
Now it's time to "pull" the pork. Remove the meat from it's baking pan and put into a clean 9x13 pan or a large cookie sheet with a raised edge (sometimes called a "jellyroll pan"). Get two dinner forks and starting with a nice crispy piece of bark, start pulling - or shredding - the pork into pieces. When you are finished, you will have a pile of bite-sized chunks of shredded meat. You can remove some of the fat at this time, but don't get rid of the crispy outer fat - pulled pork is not exactly a diet dish and that fat tastes great. 

When it's completely shredded, you can mix in barbecue sauce. I love Sweet Baby Rays, but a vinegary Carolina-style sauce is delicious too. Cover the meat with foil.

When it's time to eat, uncover your meat, put the buns and some extra sauce on the side and stand back; you don't want to be trampled in the crush of people trying to get to your pulled pork. Congratulations - you've just fed a crowd!

​If you would like to see my recipes, tips and adventures in cooking every week go to www.ucancook.net and enter your email on the right side. Alternatively, email me at [email protected] and I will set you up! For even more tips and techniques, follow You Can Cook on Facebook as well.

Comments
    Picture

    Author

    Chris, cooking instructor, disability advocate and mom. Food geek and passionate believer in fresh, simple and homemade.

    Enter your email address:

    Delivered by FeedBurner

    Categories

    All
    Best Practices
    Chocolate
    Common Sense
    Cookies
    Cool Tools
    Dessert
    Entertaining
    From The Garden
    Healthy
    Holiday Cooking
    Kitchen Adventures
    Quick
    Snack
    Taste Test!

    RSS Feed

    Archives

    June 2016
    May 2016
    April 2016
    March 2016
    February 2016
    January 2016
    December 2015
    November 2015
    October 2015
    May 2015
    February 2015
    January 2015
    November 2014

    The typeface at the top of this page is Goudy Old Style, the same typeface used in my first copy of The Fanny Farmer Cookbook. My copy is a successor of The Boston Cooking-School Cookbook, first published by Fanny Farmer in 1896. It was one of the first cookbooks to use the standard measures that are common today.